Making Stage 1 (Stage 1) Baby Food - Avocados

Avocados 

I think this is my favorite recipe so far because there's no cooking involved! It literally takes about 5 minutes to prep and blend (or mash). Plus, avocados are basically a super food. The only downside is that I've read that avocado does not freeze well. If frozen, it may turn brown and become a bit runny. I chose not to freeze avocado. Another thing to keep in mind is that avocados oxidize quickly and turn an icky brown color, so they must be used relatively quickly or sealed air-tight.

I did not grow up eating avocados. In the post-Soviet era, there were about 8 vegetables on the market and the 'exotic' avocado was not one of them.
Here's one childhood memory: I remember that circa 1995 my dad bought a coconut for me for 'Christmas' (technically, it was New Year's, but whatever) and it was SUCH a big deal. I'm not sure which is weirder, the fact that I got fruit for 'Christmas' or that we had never seen a coconut anywhere else but TV up until that point in our lives. Just imagine, my drunk family (again, it was New Year's) trying to open a coconut with a butter knife, I mean, 'the household tool'. No one knew what to do with it. It was quite disappointing. Anyway, I'm 99% sure that I had not tasted avocado until I was at least 20.

Here's a quick avocado recipe (if I can even call it that):

Intro: Due to their thick skin and other factors, avocados are not on the 'dirty dozen' list and do not have to be purchased organic. These are not organic because well, my grocery store didn't have an organic option. Avocados should be relatively firm, but when you push on them gently they should be a bit soft. If they're too soft, they're too ripe. If they're super hard, they're not ripe enough...pretty easy, right?
I bought 4 - two that were pretty ripe and two that could sit for a couple of days.
Also, when I got home I saw this sticker...thanks Fry's for moron-proofing my shopping experience.


1). Rinse off the fruit, cut in half, and remove the pit.
                                                        
                           
2). I used my avocado slicer to remove the meat of the fruit from the shell. It is a handy little tool! I have yet to master perfect slices.
                                                    

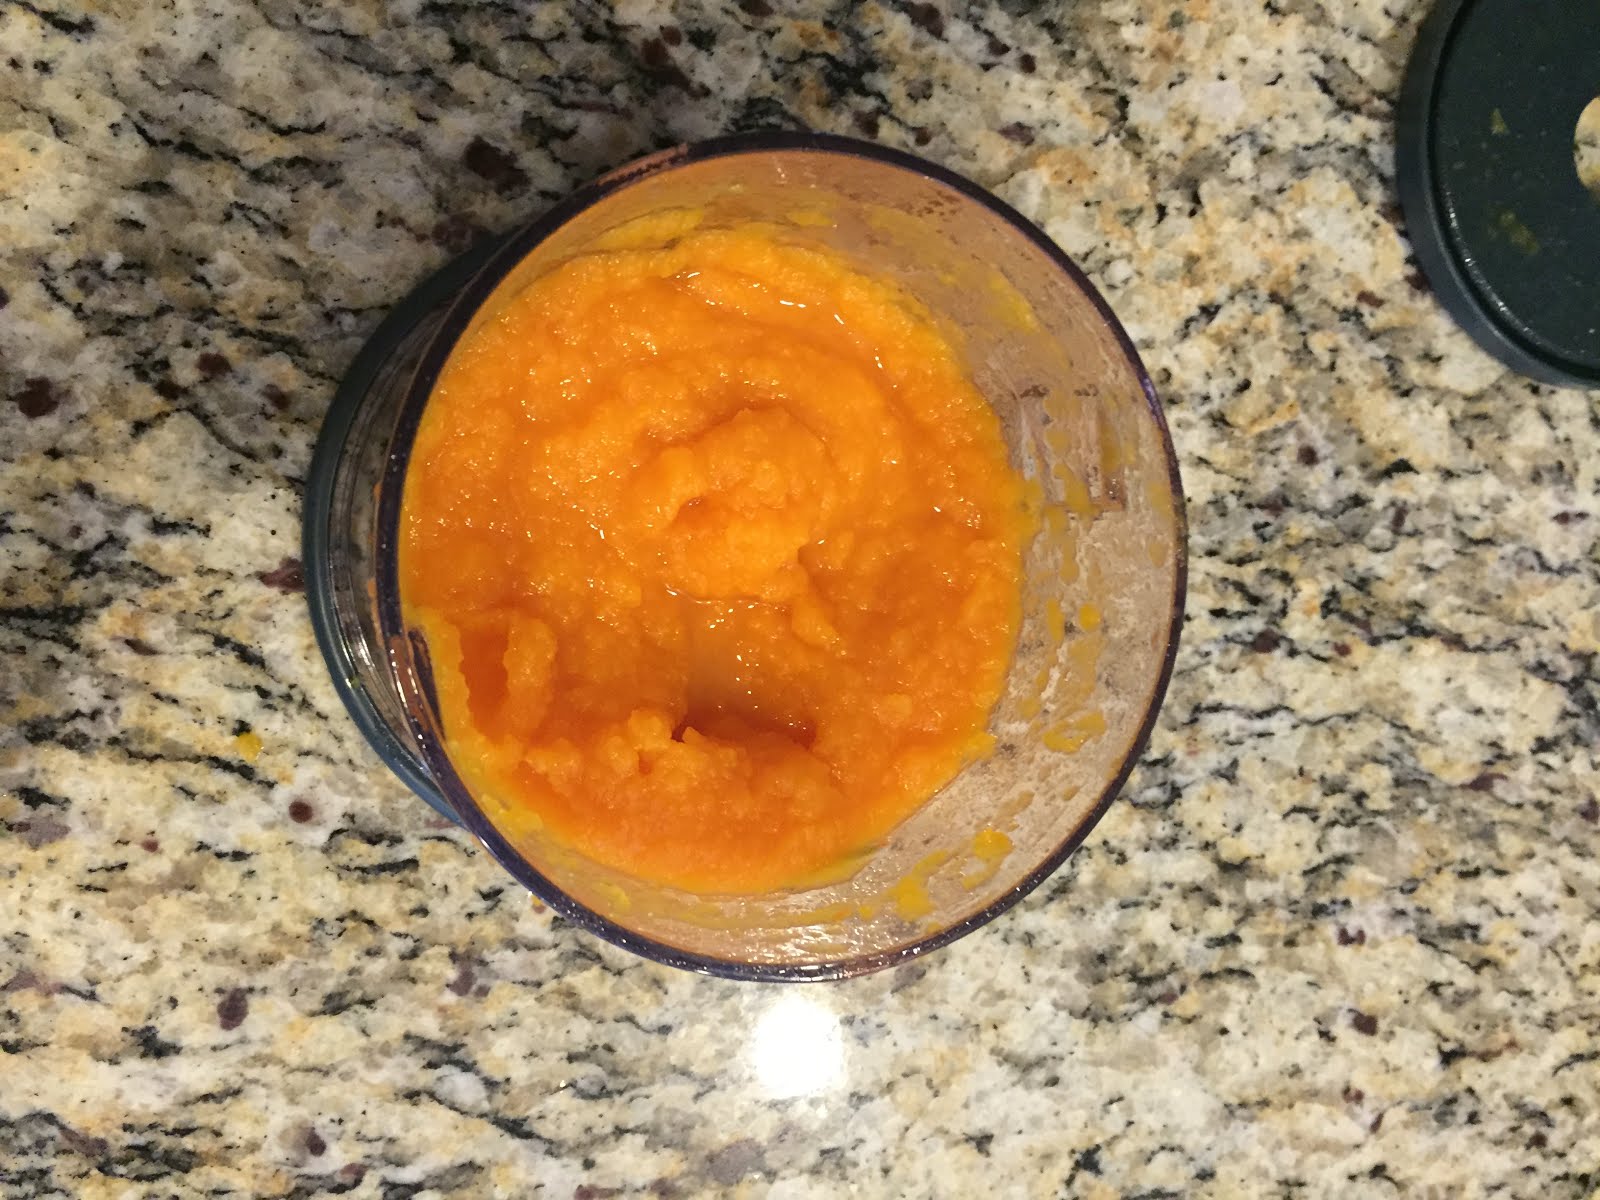
3). Blend and serve! Mine came out a bit chunkier than I expected, but Max loved it just fine.

The next day, I used a bigger avocado and refrigerated one portion in a bullet storage container. If you cover the avocado puree with plastic wrap and make sure to expel all of the air before covering with a regular lid, it should keep in the refrigerator overnight just fine. I know that most unused baby foods can be stored in the refrigerator anywhere from 48-72 hours, but I wouldn't store avocado for longer than overnight.  
      
                    .
In conclusion, a half of one medium sized avocado yields about 3oz...just enough to be too much, haha! Figures, the one thing that's difficult to refrigerate and freezes poorly comes in quantities that a portion must be stored. 


Freezing Baby Food and Thawing From Frozen

Making baby food is so much fun...until it comes to the 'freezing, storing, & thawing' part. To use a popular Russian saying, "If you love sledding, (learn to) love dragging the sled up the hill, too." The freezing, storing, and thawing is the 'dragging the sled up the hill' part.

FREEZING
I don't know why, but freezing stuff grosses me out a little and that is why I took some extra (probably super unnecessary) steps freezing/thawing baby purees.

I purchased a couple 2oz silicone containers (with lids) from Amazon and so far, they've been great. I recommend searching for 'ice cube trays', not 'baby food storage containers' because the price varies significantly. To me, the lids have been a life savor: 1). they prevent the 'freezer smell' 2). the lids allow you to stack the trays, saving you tons of room in your freezer 3). they lessen the amount of ice crystals that will form on the food.

Once the purees were frozen, I popped out each puree cube, quickly put it into a sandwich baggie, tried to expel as much air as possible (to lessen the crystallization), and seal it off. The 'quickly' came from making my husband do it with me.

The second time around, I wrapped each frozen food bit in plastic wrap, and THEN put that into a sandwich baggie. I think this was a bit redundant, but there was less crystallization on the food.

I then put each individual sandwich baggie into an even bigger freezer bag. Writing this really makes me think of how you can take the girl out of Russia, but can't take Russia out of the girl. I don't know what it is with Russians and 'bags' (especially cellophane), but I now see that I may have a problem with bagging things, and just bags in general (see self-psychoanalysis below, or skip it entirely).

UPDATE: Although wrapping in plastic wrap reduced the formation of ice crystals, it was a giant pain in the arse when reheating. I had to take it out of the bag, take the wrapping off, put it back in the bag...you get the idea. Not going to do that again.


THAWING
There are a quite a few ways to thaw baby food, I think it all depends on how much time and planning you put into it. The benefits of freezing in small sandwich baggies is that there's essentially no mess and less risk of contamination. Once the food is thawed, you can cut a small bit off the corner of the bag, you can simply squeeze it out into a bowl.
1). Thaw
2). Cut

3). Squeeze!


Ways to Thaw Baby Food


1). Thaw in the Refrigerator:
This works best when if you're a planner, which I totally am...sometimes. It's easy to do, if you remember to do it the night before. Take out the amount you will use the next day and simply place in your refrigerator to slowly thaw overnight. I usually just toss a couple of sandwich baggies onto the lower shelves of the refrigerator.
Then, when you are ready to use you can warm to room temperature by placing the purees into a bowl of warm water. You can keep the thawed, unused baby food in the refrigerator for up to 72 hours.
Here's a cool trick that works for me: I use my old french-press to thaw the food. It's nice because it holds hot liquids well, it's glass, and you can use the plunger to submerge the food. It only takes about ten minutes. I recently found yet another nifty way to use the french press...I can warm frozen cube of food & a container from the refrigerator, without entirely submerging the latter...I hafta say, I'm PRETTY STOKED about this.

2). Thaw in a warm liquid:
French press to the rescue again! This is how I normally end up heating Max's food. I grab a sandwich baggie from the freezer and thaw it in hot water for about 15 minutes.

3). Microwave in a microwave safe GLASS container:
You can also microwave the food. Make sure to check for hot spots, as microwaves tend to heat unevenly. Another thing to keep in mind is that different textures microwave differently. For example, I microwaved carrots for a total of 1:30 on 40% power and it worked great. However, this definitely scalded the apples. Many sites say to microwave in 15 second increments and to stir frequently. I don't have the patience to do stand near (not in front, haha) of the microwave. I only resort to the microwave when I've completely lost track of time and it's dinner time.

For some reason in the post-Soviet 90's, these Marlboro man plastic bags were THE shit. You could buy them at any kiosk. Later, they evolved to have shirtless men on them -- I remember my mom carrying one around all the time and me starting at pecks from an early age. I suppose that it could maybe be equated to having an Abercrombie & Fitch bag in high school? I don't know. Whatever it is, it worked, I subconsciously love bags.
Before you jump to conclusions about the smoking advertisement, let me show you a picture of what Soviet 'bags' looked like and then you will understand.
'Nuff said.

Moving from Cereal to Veggies -or- Starting on Stage 1 (Stage 1) Veggies

I was (and still am) pretty excited to start on this whole fruits and vegetable journey. I started out by making a list of all the foods I wanted baby to try and labeled them by the 'stages'. Fun cocktail party fact, it was Beech-Nut, who initially came up with the idea of baby food 'stages'...pretty impressive, right?
Anyway, it seems that the general consensus is to start on veggies first and then move on to fruits. The reason for this is quite obvious when you think about it, humans prefer the sweet taste of fruit over veggies. However, the veggies babies start on are still pretty sweet....yes, I tasted them. I gotta say, I'm definitely not a fan of the rice cereal--it tastes like gluten-free Eggo's from TJ's, which is essentially paste #sorrynotsorry).

I have also read in several books that it is recommended to start on the yellow veggies (sweet potatoes, squash, carrots) first and move to the green vegetables (green beans, peas, etc.) second.

Here's my list of 'Stage 1' foods:
Sweet potatoes
Carrots
Squash 
Zucchini
Peas 
Avocado
Pears
Apples 
Bananas
Max LOVES sweet potatoes!
Note: One of my friends wrote down the foods her baby tried as she went along and noted the symptoms (if any) next to food to know what did and did not sit well with baby. I thought this was a great idea and have implemented this as well. It can just be a post-it you keep on the refrigerator or a complete color coded list. I fall into the latter category, again, FTM problems.

Ok, so here's the 'switch'. It's essentially the same as the post I have about starting rice cereal.
You can mix in the veggie into the cereal or provide just the veggie without the cereal during the meal. All new food introductions have a four day 'trial period', during which you should introduce the food in small amounts, watch for a reaction, and increase over the course of several days.

Day 1:
Start with 1oz of veggie (or half the jar or less of a Stage 1) in the am.
Cereal for the second meal.
If you are skipping cereal entirely, start with just one meal in the early morning and work up to two meals a day on day 3 and three times a day on on day 5+ .

Day 2:
1oz of veggie in the am.
Cereal* for the second meal.

Day 3:
2oz of of veggie in the am.
Cereal for the second meal.

Day 4+:
2oz of of veggie in the am.
Cereal* for the second meal.

*or whatever food you are on at the time

If there's no reaction on day 4, you're in the clear! You can now start offering the veggie at every meal, if you so choose, but there are so many more fun foods to try!

Note: Stage 1 baby food contains 2.5oz of food and Stage 2 has 3.5oz of food.
Note: You can play it by ear and see at what point to increase from 1oz to 2. I stuck with even numbers because my baby food containers are 2oz and I will sometimes mix with cereals.

Lastly, if you're like me , and you read all these books and then decided to introduce a THIRD food into the mix and was stumped...wait, can I give him TWO veggies in the same day? Yes, you can. Say you've introduced squash (did the four days without a reaction) and then decided to introduce sweet potatoes, you can totally continue giving your baby squash for the four days a new food is introduced. I am definitely overthinking this 'solids' thing.


Yum! (Look, he's actually opening his mouth!!)
    
Meanwhile, right next to me is this....

How does this even happen???


Starting on Solids

I felt a little bit overwhelmed with the idea of starting solids. I wanted to wait as long as possible to start on solids, but we ended up starting right at six months.
First meal, ever!
It's actually not as bad as I thought it would be. You just need a few new supplies:

1). High chair
2). Bib
3). Bowl
4). Spoon
5). Baby food
6). Camera

The first couple of meals were pretty messy, mainly because the cereal we gave was quite runny and Max was still trying to 'latch on' to the spoon. Messy, but cute!

Our pediatrician said that we did not need to start on cereals because they have very little nutritional value and are mainly used as filler. However, since cereals tend to be enriched with iron and if baby is eating solids, they are consuming a bit less milk, I figured the iron was worth it. We started with rice cereal.

Max eats about five times a day, so here's what our schedule looks like:

Feeding 1: (7:30am) - breast milk
Feeding 2: (11:00am) - breast milk
Solid Feeding 1: (11:30am)
Feeding 3: (2:30pm) - breast milk
Feeding 4: (5:00pm) - breast milk
Solid Feeding 2: (6:00pm)
Feeding 5: (7:30pm) - breast milk (down for the night)

UPDATE: Here's our NEW feeding schedule at 7 months of age.
Feeding 1: (6:30-7:00am) - breast milk
Solid Feeding 1: (7:30am)
     Nap (varies - due to work) 8:30-9:20ish or the more recent one 10:30-11:30am)
Feeding 2: (11:30am) - breast milk
Solid Feeding 2: (12:00pm)
     Nap 12:30pm-4:30pm (I feed while he sleeps...we both nap)
Feeding 3: (3:00-3:30pm) - breast milk
Solid Feeding 3: (6:00pm)
Feeding 4: (7:30pm) - breast milk (down for the night)

I have read that it is better to introduce a new food in the morning, so that in case of a reaction, you will be able to spot it during the day and any take precautions necessary. Also, if there is a reaction, symptoms may subside by nighttime, and everyone will be able to get some sleep. Unfortunately, my work schedule does not permit for me to start solids at 8:00am and baby just isn't interested in eating that early. Thus, our first solid feeding is at 11:30am, it has worked well so far.

I followed the recommendations for starting solids provided by BabyWise. Here's what our first five days on solids (rice cereal) looked like:

Day 1:
1tbsp of rice cereal
4tbsp of breast milk (or liquid of your choice: formula, purified water, etc.)
= Super runny cereal, offered in the am

Note: Much of this cereal ended up on the bib, but it was pretty fun! The faces Max made were great! Like I mentioned earlier, he had a tough time because he kept wanting to suck the spoon.

Day 2:
2tbs of rice cereal
8tbsp of breast milk  (or liquid of your choice)
Offered in the am

Day 3:
3tbsp of rice cereal
around 10tbsp of breast milk
Offered TWICE: once in the am and once in the afternoon (we gradually switched to 6:00pm feeding due to our schedule)

Day 4:
4tbsp of rice cereal
(maintain runny consistency with liquid of choice)
Offered once in the am and once in the afternoon.

Day 5:
With no reactions, we continued to offer twice a day. The book recommends offering solids at least three times a day, but we're just not there yet. We're sticking to twice a day for now!

After this, I started on veggies right away.

NOTE: I have been exclusively breastfeeding and my pediatrician warned me that there is a chance that milk supply will decrease and that it is perfectly normal. I read that it is important to nurse first and then offer solids. We have been on solids for about five weeks now and are still fine, but I will keep everyone posted.

UPDATE: After 5 weeks of solids, I realized that Max might need a little bit more food. This happened after I took (ahem, pried) a spoon out of his little sticky hand he started crying and opening and closing his mouth. I felt horrible. We've altered our schedule to include another solid feeding at 3:00-3:30pm. He's also has developed a taste for the little puff snacks and he really enjoys the yogis snacks. I might make another entry dedicated to the snacks, but I just give him about 10 pieces (the dogs eat half) just to let him practice putting food in his mouth twice a day. To me, it's incredible (and super satisfying in some way) to watch your child master putting food in their mouth. Again, I'm obviously a FTM and think my kid poops rainbows...but if your kid grabs the spoon, guide them and see if they can feed themselves!


Making Stage 1 (Stage 1) Baby Food - Apples

After introducing four different kinds of veggies, I decided to give my little boy a taste of some fruit. Apples it is! I have to say, this is the EASIEST recipe I've prepared so far. I even had time to take some slow-mo videos of my Vizslas attempting to eat apples.

It is recommended that you purchase organic apples because unlike squash and sweet 'taters apples ARE on the 'dirty dozen' list. I bought a bag (3 pounds) of organic Gala apples. At first it seemed like a lot, but just like carrots, they steamed down to almost nothing. For this recipe, I used eight apples (out of 10) because, you know, my hubby and I should should stay 'healthy' and eat apples, too. In reality, they will probably just hang out in the fridge until they get mushy (and that better be soon because they're supposed to be organic and all).

1). Clean everything you will be using to prepare the baby food and wash, wash, wash your healthy looking apples. I had a good batch that didn't have any bruising or discoloration.

2). You can start heating up the water with which you will steam the apples to save some time. I used about 2 cups of water, a large pot, and the super handy steamer basket.

3). Peel the skins and slice the apples. I used an apple cutter/wedger/divider and it worked like a charm. If you've ever used an apple cutter, I'm sure you know that the trick is to make sure the cutter slices straight down evenly, otherwise you might be left with part of core (ick).

4). Place the apple wedges into the pot of boiling water, cover with a lid, and steam for about 20 minutes. The apple wedges will shrivel up a bit and come out looking like this:
5). Place the steamed apple wedges into a blender of your choice. I used about 2/3 of a cup of purified water. I'm still using my Ninja, it's just SO FAST and I don't have to tip or shake anything. No technique needed!

6). 15 seconds later we have apple purée!

7). Here's my favorite use of the Baby Bullet...the little 2oz containers! I put two in the refrigerator because we will use those for the next two days and I am freezing the rest. I ended up with 16oz of apple purée with this batch. Easy peasy apple puréezy!
 

UPDATE: In the morning, I've been giving Max apples and oatmeal for a couple of weeks now and he devours it! I also just read that after 6mo. you can also start introducing some spices. The other day I added a little bit (literally a tiny pinch) of cinnamon to his apples and oatmeal and he seemed to have really liked it. I also read that some people give cinnamon sticks to teething babies and it calms them down very quickly. I, personally, have not tried this but it is an interesting idea.

I waited until everyone went to bed to make this, but one lazy hound dragged his butt out of bed to see what I was up to. 


Seconds later, the other hound came bounding into the kitchen...but she was obviously too sleepy to think clearly. Dog #1 was back in bed before Dog #2 found her apple wedge.

Making Stage One (Stage 1) Baby Food - Butternut Squash (Oven)

After Googling the word 'squash' for 15 minutes, (er, I mean...after careful consideration) I decided to go with the butternut squash for our next stage 1 vegetable. Fun fact, it is the hardest of all squashes to cut! There are several types of squash. On a cultural note, squash is called 'pumpkin' in Russian (тыква), from which I accurately deduced that squash and pumpkin are in the same family! I have a Master's Degree and don't know my vegetable families...sad. I bought this organic, but since it ripens underground and doesn't have much exposure to pesticides, it's one of those vegetables that can be bought in-organic (?). Let me rephrase that, it's one of those vegetables you do not need to buy organic.

I went with the fun oblong shape of butternut squash, which is quite delicious and nutritious. 
:)

1). Preheat the oven to 400°F and sharpen your knife. Trust me on this one.


2). Wash the squash and cut it in half. I tried two ways: (1) laying it on its side, piercing the middle, and just cutting the halves, (this resulted in 'hesitation marks', which you can see below) and (2) standing it up the counter and just slicing straight down...surprisingly, this worked well for me but I don't think anyone would recommend this technique.

     
Result of the latter cutting technique

3). Remove all the 'meat'. I just used a spoon, but I considered getting my pumpkin carving set out.
Result of the former cutting technique
4). Lay the squash halves face down in a glass baking dish and submerge in 2 cups of water.
5). Bake uncovered at 400°F for about 40 minutes, or until the squash is nice squishy. The skin will look a bit wrinkly. I poked this one gently with my oven mitt and it sank straight down, so then I did it again to the other one because it was so much fun. 
Squishy Squash
6). Flip the squash over and you should be able to effortlessly scoop out the squash leaving the skin.


7). Place the squash into a blender and purée. I normally add some breast milk but since the squash cooked in water, it was not necessary to add anything because it was already so moist (moist, ick).

8). You can either store in the refrigerator for the recommended 48 hours, or freeze in freezer friendly trays. I prefer the 2oz silicone ice cube trays. Here's my little baby food garden; carrots and squash. Oh yeah, and that's my dog waiting for me to drop it on the floor.
The one squash yielded 26oz of food. I made two, so I hope my baby isn't sensitive to it and likes it.


Thank you for reading, I hope you enjoyed this as much as my live audience, who are always hungry for more. ;)

Making Stage One (Stage 1) Baby Food - Carrots


Here's our super easy recipe for a carrot puree (steamed):

I purchased some organic carrots, even though they are not on the list of the 'Dirty Dozen' (the fruits and veggies with the most pesticides on them). However, when it comes to baby food, I think organic is the way to go.
NOTE: Unlike sweet potatoes and squash, the return on carrots is not as great. I purchased one pound of carrots and cooked about half the bag and I thought I would have tons of carrots, but I ended up with about 12oz of baby food (about 6 servings).


1). Bring about one cup of water to a boil, make sure the pot is covered with a lid. Wash, peel, and chop off the ends of your carrots.2). Next, chop your carrots into relatively thick rings and place into the pot. Depending on the thickness and the amount of carrots the steaming time will vary slightly. I check after 20 minutes. If you can easily cut the thickest piece in half with a spoon, it's done!


3). Here's the fun part...blending! Place your steamed carrots into the 'blender' of your choice.

After experimenting with several blenders, I really just love using my Ninja Food Chopper. It's super fast and easy to use. We have a nice blender which we hardly ever use and I bought the Magic Baby Bullet, which is only magical for the containers so far (they're so stinking cute). If I had a do-over, I would have just saved the money and stuck with the Ninja, but, alas, I'm a First Time Mom. I bought the Ninja for $15 at Fry's four years ago and it's saved me COUNTLESS HOURS in the kitchen and now it's saving me time yet again.
 

3). I add a bit of breastmilk to the mix (no pun intended), but you can add some water or a liquid of your choice.


4). And voilà, baby carrot purée made! (Yes, we are now French cuisine experts and need the lingo to match.)


5). Like I mentioned earlier, I didn't get that much baby food out of this batch. You can either store your purée in the refrigerator (good for up to 48 hours, some say 72 max), or freeze. I have been cooling on the counter for about 20 minutes, then transferring the freezer friendly containers to the refrigerator for a few hours, and then freezing in the freezer.


These are 2oz silicone ice cube trays, so essentially 6 carrots yielded 7oz of baby food. Perfect if you are introducing for the first couple of days!